 |
 |
||||
 |
 |
||||
 |
 |
||||
 |
 |
||||
 |
 |
 |
 |
 |
 |
Click small pictures to enlarge.
Build Your Own Soldering Fume Extractor
An effective low cost construction project to help Electronic Technicians work in a healthier environment.
by Gary McCartney
Click small pictures to enlarge. |
||||||||||||||||||||||||
This is a construction project for a home made fume extractor system for soldering or melting plastic, etc. It drastically helps to remove unwanted fumes from the work area, however I am not guaranteeing that it will remove all the fumes nor that your repair shop will be free of unhealthy vapors. I will not be responsible for any direct or indirect consequences arising from the construction or operation of the device according to these plans. Build and use the device at your own risk. I personally believe that the fume extractor I built for myself has aided in the removal of approximately 90% of the soldering fumes from entering my lungs. This unit uses a central vacuum cannister to suck the fumes from the work area and to vent them outside of the building.
Materials required for construction:
• 3 ft: ABS plastic plumbing pipe, 1 1/2"
• 10 ft: PVC plastic central vacuum line, 1 1/2" (plus whatever
length
you need to go to the vacuum cannister in a different room)
• 1 can: Yellow ABS solvent cement
• 2 pcs: 1 1/2" ABS plumbing sink traps with with threaded
quick-disconnect at
one
end
• 2 pcs: 1 1/2" ABS pipe couplers
• 1 pc: 1 1/2" PVC vacuum pipe coupler
• 1 pc: 1 1/2" ABS threaded
quick-disconnect pipe coupler
• 1 pc: ABS 1 1/2" 90 deg. elbow
• 1 pc: ABS 1 1/2" 45 deg. elbow, one end male, other end female
• 1 pc: 2" (inside dia.) x 1 ft long iron pipe- perhaps plastic could
be subbed
• 2 pcs: 2" pipe brackets
• 1 pc: approx. 5" x 18" long heavy gauge steel or
plywood, etc. for wall mount
• 2 pcs: 2" stainless adjustable pipe clamps
• 1 pc: central vacuum cannister head unit. Also, good idea to purchase
extra
motor
brushes as they will eventually wear out from many power-on cycles
• 1 pc: Push-ON - Push-OFF 12V push button switch (should get a high quality
one as it will be used a lot)
• 1 length of 2-conductor stranded wire (med. gauge speaker wire would
do)
to
go
all
the way from the extractor to the vacuum cannister
• 1 pc: approx. 2 to 4 ft of flexible vacuum hose or similar, plus hardware
to adapt this to fit the 1 1/2" ABS and the PVC pipes
Assembly:
The measurements mentioned are typical only. There is no set rule as to the exact length you cut the pipes, etc., as long as you don't make the extractor pipes so long that they can't be self- supporting.
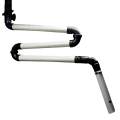
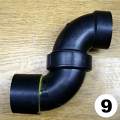
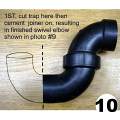
1. First, you need to alter the 1 1/2" ABS plumbing traps to work with this system. Using the photo # 10 above as reference, cut off the proper end of the trap so there will be enough room on the trap's curve to glue on a pipe coupler, resulting in a custom made elbow assembly shown in photo #9. You'll need two of these elbow assemblies.
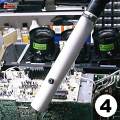
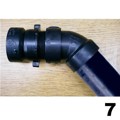
2. Glue together the threaded pipe coupler and the 45 deg. elbow as shown in photo #7. If you would prefer a 60 deg. bend for the spout instead of 45 deg., you could add a 22 1/2 deg. elbow in series with the 45 deg. elbow.
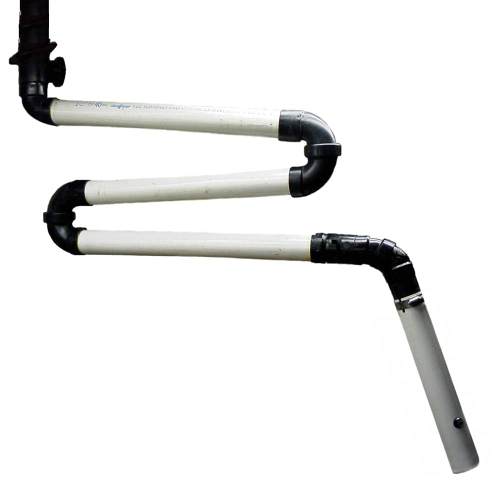
3. Cut one piece of the vacuum line about 20" and two more pieces about 18" long. Sand down the diameter at the ends if you have to, to make them fit into the ABS elbows. Wipe down the last inch or so of each pipe with solvent (laquer thinner works) to prep the plastic for glueing. I found that the yellow ABS solvent cement worked for glueing both the ABS and the PVC vacuum line. It only takes a minute or less for the glue to set. Make sure to use the 20" length of vacuum line as the one for the "top" length in the series of pipes. It is best to pre-assemble the pipes together without glue, and use a marker to show the position of all the joints, then glue afterwards.
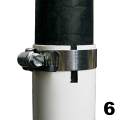
4. Next, is the fitting of the spout piece of vacuum pipe to slide over top of a length of 1 1/2" ABS pipe (see photos #2 and #6). This is required because as you are working on the bench, you want the spout length to be adjustable so it can be brought nearer or farther from the soldering work to be done. To make the vacuum pipe spout piece fit over top of the ABS pipe, you will have to grind down the surface of a 8" to 12" length of ABS while leaving 1" at the one end WITHOUT being ground down. This is so the piece can be cemented into the 45 deg. elbow. The longer you make this sliding assembly, the more you'll be able to adjust the length of the spout as you work. I used a bench belt sander for the grinding process. Whatever you use to do the grinding, note that this has to be done fairly accurately or you'll lose vacuum suction or the sliding tension won't be even along the whole length. A machine shop could do it for you easily although with a price attached to it. (At the time of writing this article, I am considering providing some of the parts for this project to be availble for sale. Click on the "Parts For Sale" link in the photos area to see the current status of availability.) Cut 1 ft to 18" of vacuum pipe for the spout, and cut three slits about an inch to 2 inches long at the one end, so that a stainless pipe clamp can be used to tighten the spout onto the ABS piece.(see photo #6)
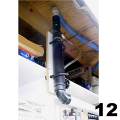
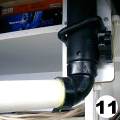
5. The last major step in the extractor pipe assembly is to fasten the assembly to the wall mount (see photos #11 and #12.). Take a length of ABS pipe approx 18" and glue it into the 90 deg. elbow at the top of the series of vacuum pipes. This ABS pipe will fit inside a 12" length of 2" iron pipe, allowing the whole unit to swivel freely across the work bench. Slide the iron pipe over the ABS, until it hits the 90 deg. elbow. Take a 2" stainless pipe clamp and fasten it around the ABS, just above the top of the iron pipe. Then take a piece of wood or heavy gauge steel which you'll use as a wall mount, and fasten the iron pipe to it with the two - 2" pipe brackets (see photo #12).
6. By now, the whole extractor pipe unit should be assembled. Just mount it to the wall or your shelving as in photo #12. Loosen all the threaded elbows so that each joint just free to swivel, but not loose enough that you'll lose suction.
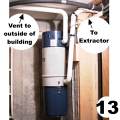
7. Mount the vacuum cannister in a different room from where you work, to prevent the noisy motor from bothering you. Connect vacuum pipes from the cannister to the extractor and to vent it outside of the building. To allow the extractor to swivel, you'll need to connect a few feet of flexible hose between the top of the extractor pipe (above the wall mount) and the solid vacuum line leading to the cannister. Depending on what type of hose you use, will determine the plumbing hardware you'll have to buy to fasten it altogether.
8. At the upper end of the extractor pipe (above the wall mount), drill a small hole into the side of the ABS pipe and feed the 2-conductor wire down the pipe assembly to the spout opening and solder the ends of the wires to the push button switch. Mount the switch about 4 inches up into the spout. Where the wire enters the pipe up above, slicone it to seal it shut. Then wrap the wire around the pipes leading to the cannister unit and connect it to the terminals on the cannister. Be sure to allow for enough extra wire inside the pipes for all the possible swivels that the unit may encounter.
Note that another possibility for the on-off function would be to design a micro-switch activated assembly connected to your soldering iron stand so that when the soldering iron is lifted off the stand, the switch would close and the vacuum would turn on. I myself, have not tried this yet.
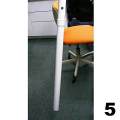
9. Lastly, you can make a spout extension pipe for when you are soldering on a unit sitting on the floor (see photo #5). Take a piece of vacuum pipe about 24" to 30" long and glue a PVC coupler to the one end. Simply slide this onto the end of the spout when you need to use it. You can design something to latch it together, or just use a few inches of tape (as I do), just so the extension doesn't fall off the spout during work.
Operation:
The extractor pipe assembly can be swivelled to almost any postion you may need. Position it so the spout is 6 to 8" away from the unit being worked on. If the spout is too close, the suction will actually cool off the soldering iron. You'll find that experimenting will give you the best results to keep most of the smoke out of your face and going up the pipes instead. I recommend that you don't use this machine for any vacuum cleaning, but rather fume extraction only. With a push button switch and wire going up inside the pipes, it would get clogged up if vacuuming dirt with it. Always turn off the suction if you are not going to solder within 20 seconds or so. No sense in wearing out the motor. On the other hand, the brushes will eventually wear out due to the constant motor starting. Mine lasted a few years though.
If you have any questions about the construction or operation of this device, please email me, Gary McCartney sales@number63.ca